My headers use a 3:1 ratio for a banner of 760 wide to 228 high. (Note: all sizes mentioned will be in pixels unless otherwise stated.) This is an arbitrary size based on what I think looks good and is also the maximum size I think I may ever use. It is far easier to reduce an image and retain its sharpness than enlarge it. This means most photos have to be resized and then cropped. I'm using brackets [ ] for buttons and commands throughout the tutorial.
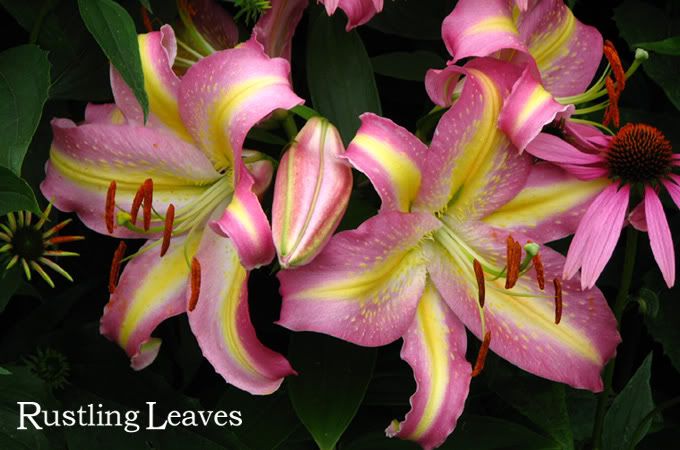
I have chosen this photo for my March banner and will open it in PSE. If your picture is not in the PSD format save it now using that file extension. Hint: As you progress through this tutorial, save your images with new names along the way. My PSE sometimes doesn’t allow me to use its [Step Backward] undo feature and I have lost work when I have gotten too cocky.
Step 1 - Resize the picture. Select [Image][Resize][Image Size] from the top menu bar. In the frame that opens, check [Constrain Proportion] at the bottom of the box and change the width from 883 to 760. The height is automatically adjusted from 585 to 504. Save the image.
Step 2 - Crop the image. Select the [Crop Tool] from the side toolbar. Mine is the third button from the top on the left-hand side. Find a section within the image that you want to use in your header and left click on one of the corners, hold, drag the cursor to the opposite corner, and release the hold. A box will have been formed with your selected portion of the image surrounded by “marching ants”. One of the features of PSE that I really like is the ability to change the size of your crop-box by positioning your mouse on edges and in corners and dragging the box into different proportions. (If you are of a creative bent, move the mouse outside the “marching ants” and the cursor will change into a double-headed arrow that will allow you to change the angle of the crop-box in relation to the original image.)
When you are ready, select [Image][Crop] from the Menu Bar. If you are lucky, the image will be very close to the 760x228 goal. Select [Image][Resize][Image Size] from the menu bar to see how close you are. If you are off by more than 5 to 8 pixels on the height you should remove your cropping and start over. This is the most frustrating part of making a header for me as I finesse the crop to come as close as I can to 228. I wish I could create a crop box in a specific size and move the box around the image to frame the most desirable part of the image for me but my version of PSE won’t let me. And the other frustrating part is the [Step Backward] undo button won’t let me reverse the crop. The work-around is to go to [Edit][Undo Crop] on the menu bar. Don’t ask how long it took me before I found this feature.
I was in luck as my image is 760x331 but I still need to change it to 760x228. Do that by going to [Image][Resize][Image Size] from the menu bar, uncheck [Constrain Proportion], and change 331 to 228. Save your image.
Step 3 - Working with layers. If you look to the right of the standard toolbar there are a number of labeled tabs, called Palettes in PSE. Look for the tab named [Layers], click on it and you will see this.
Click on the tab, hold, and move the Layers palette to a position closer to the right side of your image. The picture is in a layer named “Background” and the symbol on the right means the layer is locked.
The layer needs to be unlocked. To do that, right click on it and select [Duplicate Layer]. A box will open up, suggesting a name for the new layer as “Background Copy”. Click [OK] and you will now see two layers on the palette, one locked and one unlocked.


At the bottom of the Layers palette are 3 icons. The one on the right is a garbage can, used for deleting layers. Click and hold on the layer with the lock (named “Background”), drag it to the garbage can and release. You can also right click on the unneeded layer and select [Delete Layer] from the shortcut menu. There will now be one layer in the palette.
The layer with your photo should not be considered the bottom or “Background” layer so a new layer is needed. The middle icon on the bottom of the Layers palette will [Create a New Layer] when clicked. Do so, now. A new layer, named “Layer 1”, was added above your selected layer. The new layer needs to be below the picture layer. Click on “Layer 1”, hold, drag it to below the picture layer, and release.
The layers need to be renamed. Right click on the bottom layer, “Layer 1”, and select [Rename Layer]. Call it “Background” and click [OK].

Do the same for the picture layer and call it “Photo”.
Save your image.
Step 4 – Adding some text. I did not want a jokey, trendy, or cartoonish font on my image and knew a modern or san-serif font would be in conflict with the rest of my page so my choice was among serif fonts - letters with little extensions on the tops and bottoms. I also wanted capital letters that would extend beyond the top and bottom limits of the lowercase letters, a combination of drop-cap/raise-cap look.
There are many font styles and places to find them on the web. My favorite is dafont because it has many useful ones, you can display a lot of them on a page for easy comparing, and the site downloads to my computer quickly.
You are now ready to add some text. Click on your “Photo” layer to select it and then add a new layer above it. Click on the new layer to select it. This is done so anything you write can be changed, manipulated, or discarded without affecting the rest of your image.
Select the [Text Tool] from the side toolbar. Mine is the third button from the top on the right-hand side. I want the letters to be horizontal but you have the option of vertical text by clicking and holding the button or right clicking on the button and selecting vertical. PSE automatically loads all of the fonts on your computer and makes them available for your work, so pick out a favorite style and continue.
You will notice that a new toolbar opens each time you select a tool from the side toolbar. I made the following choices for my first run: font=Bookman Old Style; style=Regular; size=24 pt. I have one last thing to do before writing anything. If you look at the box on the toolbar that is second from the right you will see it is red (in my case). I want my letters to be white so this needs to be changed.
Click on the red square [Set the text color] and the [Color Picker] will open.
There are different ways to describe colors on the web, RGB (red green blue) and hexadecimal being two of them. We are going to use hexadecimal and the box for that is at the bottom. Type in ffffff (6 f's), the code for white. You can choose any color you want by using the slide controls on the rainbow colored bar to find one you like. Click anywhere in the large color box on the left to select specific colors. Click [OK] when you are done.
Select an area where you want your lettering and type it in. It isn't important at this time to position your letters perfectly; we will work on that later. What you’re trying to do is see if the font size and style are to your liking. I have typed “ustling eaves”, leaving space for the capital letters to be added later.
The letters are too small so I will change them. Be sure that you are still on the text layer and change the font size to 36. I will also click in between the letters and add an extra space. This looks really good to me so I will save my image.
Step 5 –Moving the text. The letters need to be repositioned. Check to be sure you are on the correct layer and choose the [Move Tool] from the left sidebar. Mine is the top button on the right-hand side. You can use the move tool to guide your letters wherever you wish. I want mine centered in the image and will position them there, keeping in mind to leave space for adding capitals to each word.
I could add one more layer for both capitals but I want better control on where I place them so will be adding a layer for each of them. Add a new layer above your text layer, select the [Type Tool], change font size=48, type “R”, and select the [Move Tool] to place it. 48 was a good guess for the font size, I got lucky.

Do the same thing for the “L”. Add a new layer above the “R” layer, select the [Type Tool], font size=48, type “L”, and select the [Move Tool] to place it.

Save your image
Step 6 – Making the text stand out. I thought my image looked murky and too much a part of the background at this point when I made my first header. My first thought was to try a 3-d effect but I wasn’t happy with the amateurish look of my first samples. My next idea was to use a cool shadow effect and again, was stymied by the software and my limited skill. I started searching the Internet – don’t we all? – looking for a solution. I flipped through many sites, seeking a simple and elegant resolution for my problem. I finally found it and am especially pleased with its simplicity. The answer was to add a band of color behind the text.
Click on “Photo” on the layer palette and add a new layer. This will position the new layer between your picture and the text. Click on the new layer to select it.
Select the [Rectangular Marquee Tool] from the side toolbar. Mine is the top button on the left-hand side. This one is a little tricky to place because you cannot resize it after you create it. Try to imagine the upper and lower boundaries you want included in your band before you begin. Place your cursor in one corner, left click, hold, drag to the opposite corner and release. You will see a line of “marching ants” outlining the area you’ve selected. If you aren’t happy and want to remove the selection, choose [Select][Deselect] from the top menu bar or the keystrokes [ctrl][d]. Be patient, you will eventually draw one to your liking.
At the bottom of the side toolbar are two colored boxes. Click on the left [Set foreground color] box to open the [Color Picker]. If you want the band to be black, type 000000 (6 zeroes) in the hexadecimal box or use the rainbow slide to choose another color. Click [OK] to close.

Be sure the layer above “Photo” is still selected and the ants are still marching. Select the [Paint Bucket Tool] from the side toolbar. Mine is the sixth button from the top on the left-hand side, shaped like a tipping paint can. Left click anywhere within the “marching ants” but not on your letters.

One more step to go and you will be done. Be sure you are still on the layer with the band you just created. If you look at the top of the Layers Palette you will see a box labeled “Opacity” and 100% within the box. Click on the little arrow to the right [Set the opacity] and a slide control will open. I have found 24% works well but experiment with changing the transparency of your band until you are satisfied. Save your image.


Congratulations, the hard work of creating a header template is done!
Step 7 – Saving an Internet-ready image. I resize my images before using them on the Internet. My current banner is 680x204. Select [Image][Resize][Image Size] from the top menu bar. Check [Constrain Proportion] at the bottom of the box and change the width from 760 to 680. The height will automatically change to 204. Save your image for use on the Internet as a JPEG and, if you’re using PSE, with an Image Option level of 10 and quality level of Maximum. A nagging message may show up, warning you will lose quality but ignore it. Save the file.
Step 8 – Adding new photos. If you look at what you’ve accomplished, it won’t seem like much after so much work. And truthfully, it isn’t. The beauty of what you’ve done is creating a template for all your future headers. Changing pictures is easy. Follow Steps 1 & 2 with a new image. Open your header template and the [Layers] palette. Click on the “Photo” layer from the template to select it. Click on the [Move Tool] button. Click on the layer of your new picture in the palette, hold, drag it to your template (not the layer palette), and release. Reposition the new layer so it completely fills the template. You will notice that a new layer was made on the [Layers] palette above your old picture. Click on your old “Photo” layer, hold, and drag it to the garbage can at the bottom of the palette. Save your new header template with a new name, if you want. Done!